


How to Prepare a Brooder for Improved Kienyeji Chicks in Kenya
How to Prepare a Brooder for Improved Kienyeji Chicks in Kenya
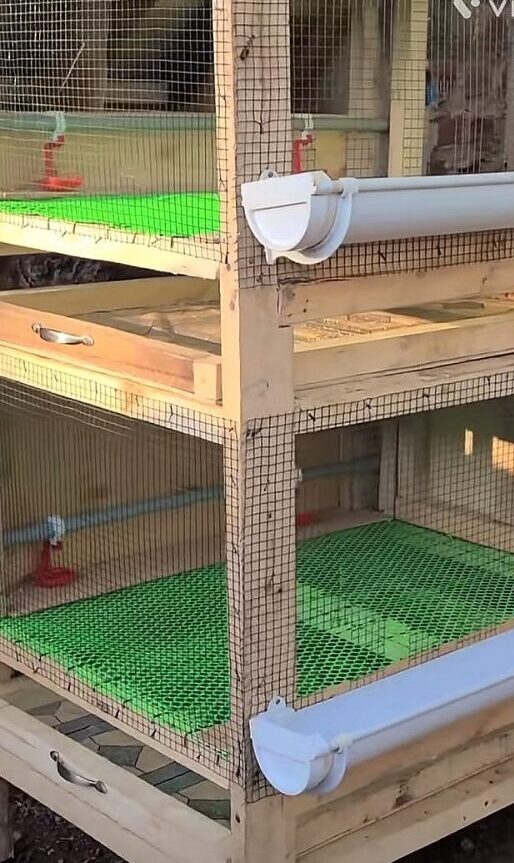
Introduction
Successful poultry keeping begins before the chicks arrive. Proper brooder preparation for improved kienyeji chicks helps farmers create a warm, clean and secure environment where young birds can settle, drink water, access feed and grow with fewer avoidable problems.
Whether you are raising a small flock at home or preparing to supply a growing poultry business, your brooder needs suitable heating, clean bedding, enough space, fresh air and reliable access to water. Poor preparation can expose young chicks to chilling, overheating, dehydration, overcrowding and infections.
Farmers in Thika, Kiambu and other parts of Kenya should also consider local temperatures, the type of housing available and whether electricity is reliable before selecting a heating method.
In this guide, we explain how to prepare a chick brooder, what equipment to purchase, how to manage temperature and how to maintain a clean environment during the early stages of poultry production.
1. Choose a Suitable Location for Your Chick Brooder
The first step in brooder preparation for improved kienyeji chicks is selecting a suitable location. A good brooder should protect chicks from rain, strong wind, predators, excessive noise and sudden temperature changes.
Choose a location with the following features:
-
A dry floor that does not allow water to collect.
-
Protection from direct wind and cold drafts.
-
Adequate ventilation to remove moisture and stale air.
-
Easy access for feeding, watering and daily inspection.
-
Secure doors, windows and openings to prevent predators from entering.
-
Enough room for the chicks to move away from the heat source when necessary.
Avoid placing the brooder in a damp room, a poorly ventilated store or an area where chemicals and pesticides are kept.
If you are preparing a poultry unit in Thika, check the actual conditions inside the house during both daytime and nighttime. A room that feels warm during the day may become too cold after sunset.
2. Gather the Essential Chick Brooder Equipment
A chick brooder equipment checklist helps you avoid rushing to purchase supplies after the chicks have arrived.
| Equipment | Purpose |
|---|---|
| Heat lamp or suitable brooder heater | Provides warmth during early growth |
| Thermometer | Measures temperature at chick level |
| Feeders | Gives chicks convenient access to feed |
| Drinkers | Provides clean drinking water |
| Dry bedding material | Absorbs moisture and improves footing |
| Brooder guard | Keeps chicks near warmth, feed and water |
| Cleaning supplies | Helps maintain hygiene |
| Backup heating plan | Reduces the risk of sudden heat loss |
The amount of equipment required depends on flock size and the design of your brooder.
Choose feeders and drinkers that chicks can use comfortably without climbing inside them or contaminating their contents easily. Keep water containers stable to reduce spillage and wet bedding.
A thermometer is particularly useful because relying on how warm the room feels to a person may not accurately indicate the conditions experienced by chicks.
3. Set the Correct Brooding Temperature
Temperature management is one of the most important parts of chick housing preparation in Kenya. Young chicks need a warm area because they cannot regulate their body temperature as effectively as older birds.
As a general starting point, many poultry management guides recommend approximately 32–35°C at chick level during the first week, followed by a gradual reduction of about 2–3°C per week, depending on the chicks’ behaviour, feather development and environmental conditions.
These figures are guidelines rather than rigid rules. Follow the recommendations supplied by your chick supplier or poultry professional where available.
How to tell whether the brooder is comfortable
-
Chicks crowding directly under the heater and making persistent distress calls: The brooder may be too cold.
-
Chicks moving far from the heat source and panting: The brooder may be too hot.
-
Chicks gathering on one side: There may be a draft, uneven heating or another disturbance.
-
Chicks spreading around the brooder, moving normally and accessing feed and water: Conditions may be more comfortable.
Observe the flock regularly, particularly during the first few nights. Adjust the heat source when necessary, and always allow chicks enough space to move away from excessive heat.
4. Select Safe Bedding for the Brooder
Bedding protects chicks from direct contact with a cold floor and helps absorb moisture. However, the wrong material can cause slipping, respiratory irritation or digestive problems if chicks consume it.
Suitable bedding should be:
-
Clean and dry.
-
Absorbent.
-
Free from mould and strong chemical smells.
-
Comfortable enough for chicks to walk on without slipping.
-
Easy to inspect and replace when soiled.
Clean wood shavings designed for poultry housing can be suitable when used correctly. Avoid mouldy materials, very dusty bedding and slippery surfaces such as smooth newspaper.
During the first days, check that the chicks can stand and walk securely. Replace wet bedding promptly, especially around drinkers, because damp litter encourages poor hygiene and may contribute to health problems.
Do not simply cover wet bedding with another layer. Remove the wet section, address the source of the moisture and replace it with clean, dry material.
5. Calculate the Space Required for Your Chicks
Brooder space requirements for chicks depend on their age, body size, the housing system, ventilation and local conditions.
Overcrowding can restrict movement, prevent weaker chicks from reaching feed and water, and increase moisture and waste accumulation. A brooder that appears spacious for day-old chicks may become unsuitable as the birds grow.
Before deciding how many chicks to accommodate, consider:
-
The number of chicks you intend to keep.
-
The floor area available.
-
The type and number of feeders and drinkers.
-
The capacity of the heating equipment.
-
How the available space will increase as chicks grow.
Use the stocking guidance provided by your supplier or poultry extension officer, and expand the available area as the flock develops.
Do not calculate capacity from floor size alone. The brooder must also provide adequate ventilation, comfortable temperatures and convenient access to equipment.
6. Provide Good Ventilation Without Exposing Chicks to Drafts
Chick brooder ventilation and hygiene go together. Chicks require fresh air, but direct cold air blowing across them can cause chilling.
A well-designed brooder allows stale, humid air to escape while maintaining a suitable temperature at chick level. Signs of poor ventilation can include persistent dampness, strong ammonia smells, excessive condensation and dusty air.
To improve ventilation:
-
Provide suitable openings for air exchange.
-
Avoid sealing the brooder completely to retain heat.
-
Position chicks away from direct drafts.
-
Remove wet bedding and spilled feed.
-
Avoid using smoky or poorly vented heating methods indoors.
-
Inspect the brooder regularly for excessive moisture.
If using a fuel-burning heater, ensure it is designed for the setting, properly installed and adequately vented. Carbon monoxide can be fatal to people and birds. Keep flames and hot equipment away from bedding and other combustible materials.
7. Prepare Clean Water and Feeding Points
Although brooder setup focuses on housing and warmth, access to water and feed is equally important from the moment chicks arrive.
Arrange drinkers and feeders so that chicks can locate them easily without crowding into one area. Use equipment suitable for young birds and check that drinkers are not too deep or unstable.
Before arrival:
-
Wash and rinse feeders and drinkers.
-
Provide clean drinking water.
-
Position equipment within easy reach of the chicks.
-
Check that water does not leak onto the bedding.
-
Make sure all chicks can access feed and water.
-
Inspect equipment several times daily.
For detailed advice on feeding as chicks grow, read our improved kienyeji chicks feeding guide.
The aim is to make feed and water easy to access without compromising hygiene or creating wet patches in the brooder.
8. Clean and Disinfect the Brooder Before Arrival
Preparing a poultry brooder before chicks arrive should include thorough cleaning. A brooder previously used for another flock may contain waste, contaminated bedding or disease-causing organisms.
Follow these steps:
-
Remove old bedding, feathers, feed residues and manure.
-
Wash equipment and surfaces using an appropriate cleaning method.
-
Apply a poultry-safe disinfectant according to its label.
-
Allow the required contact time and drying period.
-
Ensure the area is adequately ventilated before introducing chicks.
-
Add fresh bedding and arrange clean equipment.
-
Start the heating system early enough to stabilise conditions.
Never mix disinfectants or cleaning chemicals. Follow the product instructions and keep chicks away during cleaning and treatment.
Where possible, keep the brooder separate from older birds and avoid sharing dirty equipment between groups. Good hygiene is easier to maintain when visitors, footwear and equipment movements are controlled.
9. Test the Brooder Before the Chicks Arrive
One of the common mistakes farmers make is switching on the heater only after collecting their chicks.
Test the brooder in advance so that you can identify equipment faults, temperature variations and water leaks before the birds arrive.
Your pre-arrival inspection should confirm that:
-
The heating system works safely.
-
The temperature is suitable at chick level.
-
Bedding is clean and dry.
-
Feeders and drinkers are ready.
-
Water is available.
-
Air can circulate without creating cold drafts.
-
Electrical cables and heaters are protected.
-
The brooder is secure against predators.
-
A backup plan exists for power failure or heater breakdown.
Prepare a reliable plan for cold nights and power interruptions. Do not use open fires or improvised, unvented heaters in an enclosed brooder.
If you are still arranging your first flock, you can also read our guide on how to start improved kienyeji chicken farming.
10. Avoid These Common Brooder Preparation Mistakes
Even a well-built poultry house can become unsuitable if daily management is poor.
| Mistake | Why it matters | Better approach |
|---|---|---|
| Heating the brooder too late | Chicks may arrive in a cold environment | Test heating before arrival |
| Overheating the entire area | Chicks cannot escape excessive heat | Create a warm zone and a cooler zone |
| Using wet bedding | Increases moisture and hygiene problems | Remove wet sections promptly |
| Poor ventilation | Allows humidity and harmful gases to accumulate | Provide fresh air without direct drafts |
| Too few drinkers or feeders | Some chicks may struggle to access resources | Provide suitable equipment for flock size |
| Ignoring nighttime conditions | Temperature may fall after sunset | Inspect the brooder at night |
| Using unsafe heaters | Creates fire and poisoning risks | Use appropriate, safely installed equipment |
| Keeping overcrowded chicks | Restricts movement and increases contamination | Expand the space as chicks grow |
Regular observation is more useful than assuming the brooder remains suitable because it was prepared correctly on the first day.
11. Where to Buy Improved Kienyeji Chicks for Your Prepared Brooder
Once the brooder is ready, the next step is sourcing chicks from a supplier who can explain their age, source, handling and any relevant health records.
If you are looking for birds in the local area, visit our page for improved kienyeji chicks for sale in Thika.
Farmers elsewhere in the county can also explore improved kienyeji chicks in Kiambu.
Before placing an order, confirm current availability, price, collection or delivery arrangements and the recommended management instructions for the chicks you intend to purchase.
Avoid bringing chicks home before the brooder is clean, warm and ready. Coordinating the arrival with your preparation reduces unnecessary delays and helps you focus on the flock from the beginning.
12. Brooder Preparation Checklist for Kenyan Poultry Farmers
Use this checklist before collecting your chicks.
Pre-arrival checklist
0 of 10 complete
Reset checklist
Frequently Asked Questions
How early should I prepare a brooder before chicks arrive?
Prepare and test the brooder in advance, preferably at least a day before the expected arrival. This allows you to clean the area, stabilise the temperature and correct problems with heating, bedding or drinkers.
What temperature should a brooder be for day-old chicks?
A common starting guideline is approximately 32–35°C at chick level during the first week. Adjust according to chick behaviour, supplier guidance and actual conditions. Provide a cooler area so chicks can move away from the heat when necessary.
Can I brood improved kienyeji chicks without electricity?
It may be possible with a suitable alternative heating system, but it requires careful planning. Any heater must be safe for the housing arrangement, provide reliable warmth and avoid exposing chicks or people to smoke, fire or carbon monoxide.
How often should brooder bedding be changed?
There is no single schedule suitable for every brooder. Inspect bedding daily and remove wet, mouldy or heavily soiled sections immediately. Replace bedding as needed to keep the environment clean and dry.
When should chicks be moved out of the brooder?
This depends on age, feather development, weather, housing and whether the birds can maintain suitable body temperature without supplemental heat. Reduce heating gradually and avoid moving chicks into a cold or poorly prepared house.
Conclusion
Brooder preparation for improved kienyeji chicks is an essential part of responsible poultry management. A suitable location, safe heating, dry bedding, good ventilation, adequate space and clean feeding equipment give young birds a better environment in which to settle and grow.
Prepare the brooder before collecting your chicks, monitor conditions throughout the day and night, and make adjustments as the birds develop. Good preparation also helps you identify equipment problems before they affect the flock.
If you are planning to raise improved kienyeji chickens in Thika, start by preparing your housing and then confirm the availability and collection arrangements for your chicks.
Contact Chickmasters Poultry and Hives Shop
Need improved kienyeji chicks in Thika?
Contact Chickmasters to enquire about chick availability, current prices and ordering arrangements.
0119076723
Website: Chickbeefarming.co.ke